How to Grow Food in a Closet ?
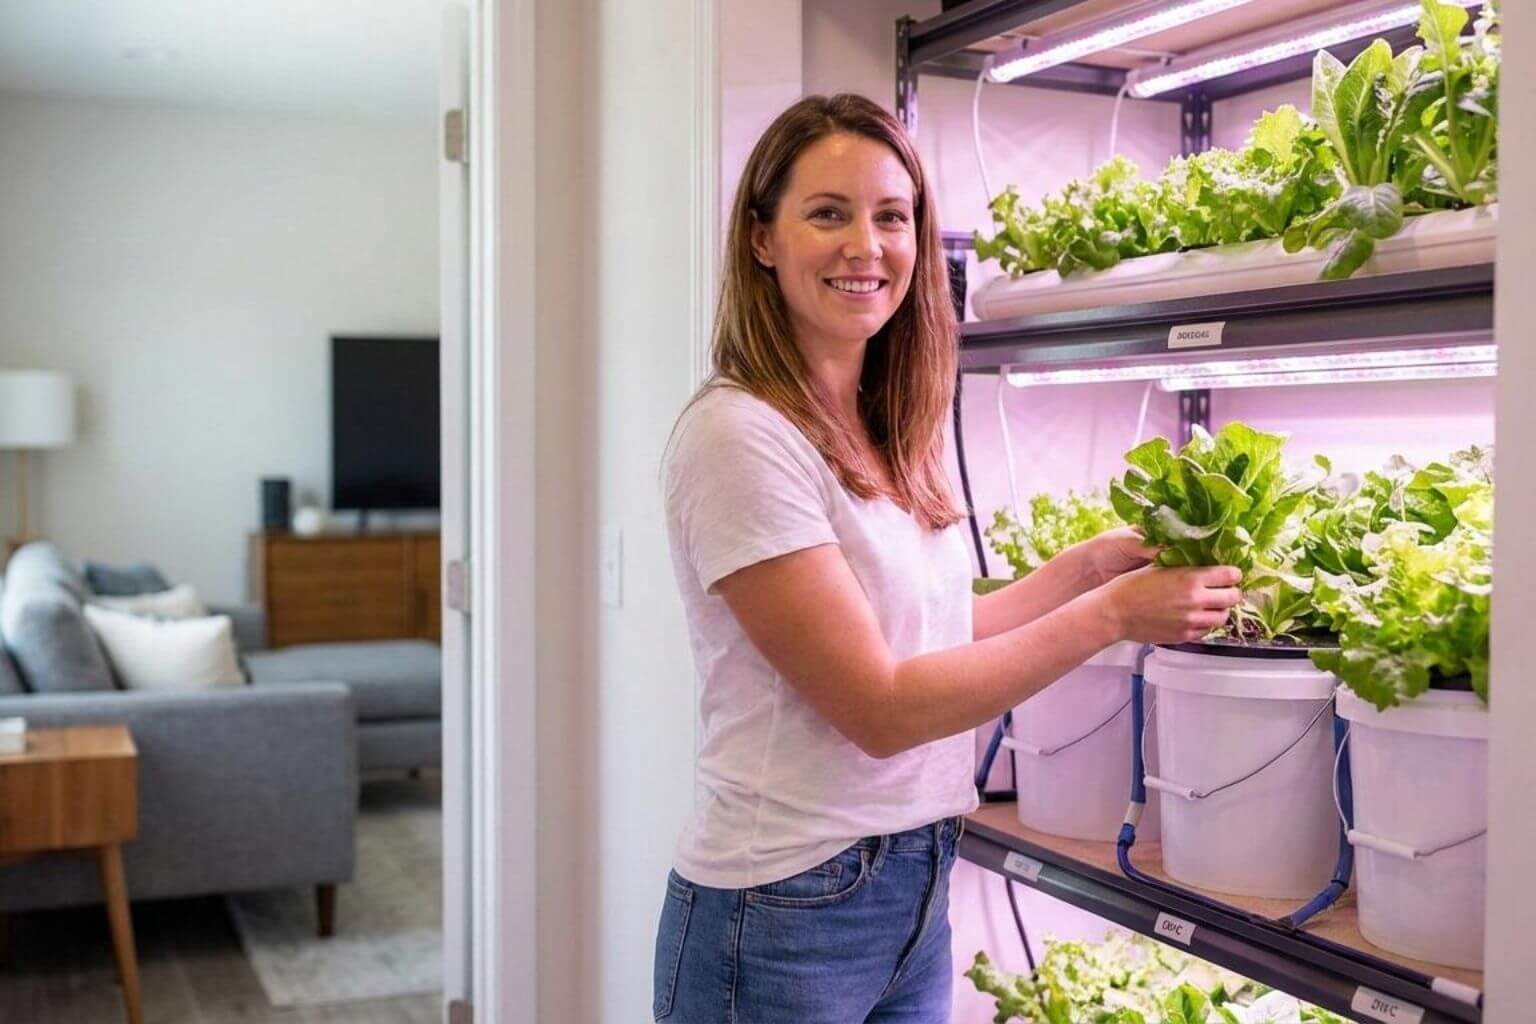
How to Grow Food in a Closet – The Beginner’s Guide to Indoor Hydroponics
Harvest fresh greens year-round without soil or sunlight
The Problem We’re Solving
Food at the grocery store is expensive, and sometimes the quality isn’t great. Many people living in cities or apartments want to grow their own fresh vegetables and herbs, but they don’t have a backyard or garden space. The good news? You can grow food right inside your home even in a closet using a method called hydroponics.
Why Hydroponics? Speed and Yield vs. Soil Gardening
Hydroponics is a way to grow plants in water instead of soil. According to the University of Minnesota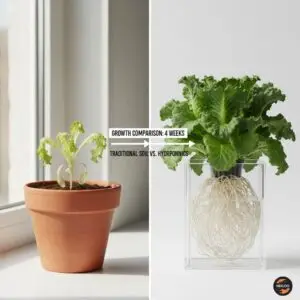 Extension, hydroponics uses less water than traditional gardening and eliminates weeds since plants grow in water.
Here’s why hydroponics is better for indoor growing:
- Faster Growth: Plants can grow up to 25% faster because their roots get nutrients directly from water (source: Indoor Hydroponic Gardens guide)
- No Soil Mess: Everything stays clean inside your home
- Less Space Needed: According to Indoor Hydroponics Info, hydroponic systems can save up to 98% of space compared to traditional gardens
- Year-Round Growing: You can harvest fresh food every month, even in winter
- Better for Beginners: According to Happy Hydro Farm, hydroponic herbs are easy to care for and will grow well in almost any hydroponic system
How it compares to soil gardening:
- Soil gardening in pots indoors often fails because plants don’t get enough light or proper drainage
- Hydroponics gives you complete control over water, nutrients, and light
- You can grow more plants in a smaller space
System Types: Kratky vs. Deep Water Culture (DWC) Explained
For beginners, two systems are the easiest to start with: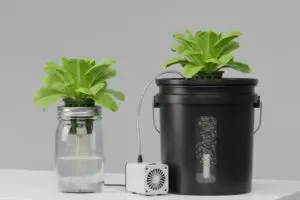
The Kratky Method (Simplest Option)
This system needs no electricity and no pumps. You simply:
- Fill a container with nutrient water
- Place your plant so roots touch the water
- As the plant drinks water, an air gap forms naturally
- The air gap gives roots oxygen
Best for: Single plants, herbs, lettuce
Deep Water Culture (DWC) – Recommended for Beginners
According to Advanced Nutrients, most hydroponics experts agree that Deep Water Culture is the easiest type of system for beginners because it requires the least amount of materials and know-how.
How DWC works:
- Plant roots sit in nutrient-rich water
- An air pump (like one for fish tanks) bubbles oxygen into the water
- The bubbles keep roots from drowning and help plants grow faster
What you need for a basic DWC system:
- A 5-gallon bucket (available at hardware stores)
- A net pot (holds the plant)
- An air pump with air stone (from pet stores, costs around $10-15)
- Growing medium like clay pebbles
- Hydroponic nutrients
- A grow light
According to Square Mile Farms, deeper storage containers work well for DWC systems because the deeper the reservoir of water, the more stable the nutrient solution.
Lighting 101: Calculating PAR and PPFD for Indoor Grow Lights
Since you’re growing indoors without sunlight, you need artificial lights. Don’t worry, understanding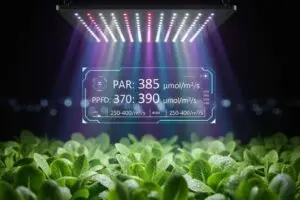 this is simpler than it sounds!
What is PPFD?
PPFD stands for “Photosynthetic Photon Flux Density.” Think of it as measuring how many light particles hit your plants each second. It’s measured in µmol/m²/s (you don’t need to memorize this just know higher numbers = more light).
How much light do your plants need?
According to Mars Hydro’s research, seedlings need 100-300 µmol/m²/s, while plants in their vegetative growing stage need 400-600 µmol/m²/s.
Simple light requirements:
- Lettuce and herbs: 200-400 µmol/m²/s
- Young seedlings: 100-300 µmol/m²/s
- Light duration: 12-16 hours per day
Choosing the Right Grow Light
Best choice for beginners: LED grow lights
Why LEDs are best:
- Use less electricity (save money)
- Don’t get too hot (safer in small spaces)
- Last for years
- According to the Home Depot guide, LED lighting is recommended for energy savings because plant lights use less energy than fluorescent bulbs
What to look for when buying:
- Check if the manufacturer provides PPFD information
- Look for “full spectrum” lights (they have all the colors plants need)
- For a small 2×2 foot space, you need about 100-200 watts
Pro tip: You don’t need expensive special “grow lights.” According to the University of Minnesota Extension, if you have a very sunny south-facing window, you may be able to grow plants without artificial lights, but for consistent results in a closet, artificial lighting is necessary.
Nutrient Mixing: The N-P-K Ratios You Actually Need
Plants need food, just like you do. In soil, they get nutrients naturally. In hydroponics, you add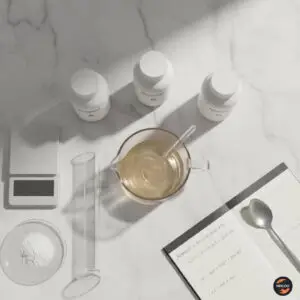 nutrients to the water.
Understanding N-P-K
On nutrient bottles, you’ll see three numbers like “8-15-36.” These represent:
- N = Nitrogen (helps leaves grow green and strong)
- P = Phosphorus (helps roots grow)
- K = Potassium (helps overall plant health)
What nutrients to buy
For beginners, I recommend buying pre-mixed hydroponic nutrients. Popular brands include:
- General Hydroponics Flora series
- Masterblend (affordable option)
- Any brand labeled “hydroponic lettuce formula”
How to mix nutrients
According to Upstart University, if the nutrient bag says 1:100 gallons and you only have 25 gallons in your reservoir, you’ll need to mix 0.25:25.
Simple mixing steps:
- Fill your bucket with water first
- Add nutrients according to package directions (usually 1-2 teaspoons per gallon)
- Stir well
- Check pH level (explained in next section)
Important: Start with half the recommended amount for young plants, then increase as they grow larger.
pH Balancing: How to Test and Adjust Water Acidity
pH tells you if your water is acidic (sour like lemon) or basic (like soap). Plants can only absorb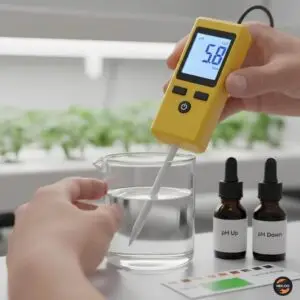 nutrients when pH is in the right range.
The Magic pH Range
According to Oklahoma State University Extension, nutrient solutions used for soilless culture should have a pH between 5 to 6, usually 5.5.
Ideal pH for common crops:
- Lettuce: 5.5-6.5
- Basil and herbs: 5.5-6.5
- Most vegetables: 5.5-6.5
According to NoSoilSolutions, most hydroponic crops thrive in a slightly acidic range between 5.5 and 6.5.
How to test and adjust pH
What you need:
- pH test kit or digital pH meter (costs $15-30)
- pH Down (usually phosphoric acid)
- pH Up (usually potassium hydroxide)
Steps to maintain proper pH:
- Test your water AFTER adding nutrients
- If pH is too high (above 6.5), add a few drops of pH Down
- If pH is too low (below 5.5), add a few drops of pH Up
- Wait 10-15 minutes, then test again
- Check pH every 1-2 days
According to the Oklahoma State University guide, pH and EC should be checked daily at the same time of day, and water temperature of 72 to 75°F is optimal.
Pro tip: According to Advanced Nutrients, if possible, use reverse osmosis (RO) water for your nutrient solution, as tap water with high mineral content could harm your plants. However, filtered tap water usually works fine for beginners.
Seed Starting: Germinating in Rockwool Cubes
Starting seeds in hydroponics is different from soil. You need a special growing medium.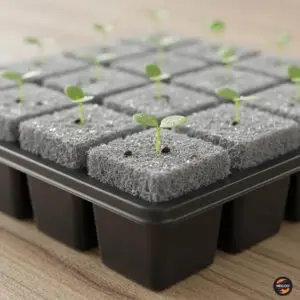
What is Rockwool?
Rockwool (also called stone wool) is a spongy material made from melted rock that’s spun into fibers. It holds water well and gives roots something to grip.
How to start seeds
According to the University of Minnesota Extension, you can purchase plant starter cubes or grow plugs online or from gardening stores, and these cubes should be soaked in water before using them.
Step-by-step seed starting:
- Soak the rockwool cubes: Place them in water with a pH of 5.5 for 30 minutes
- Place 1-2 seeds in the hole on top of each cube
- Cover lightly with a small piece of rockwool or leave uncovered (check seed packet)
- Keep moist but not soaking wet until seeds sprout (usually 3-7 days)
- Provide gentle light once sprouts appear (seedlings need 12-14 hours of light)
- Transplant to your system when seedlings have 2-4 real leaves (usually after 1-2 weeks)
Alternatives to rockwool:
- Coconut coir plugs (more eco-friendly)
- Rapid Rooter plugs
- Even paper towels work for starting seeds before moving to cubes
Best Crops: Lettuce, Herbs, and Microgreens for Beginners
Not all plants are easy to grow hydroponically. Here are the best choices for your first garden: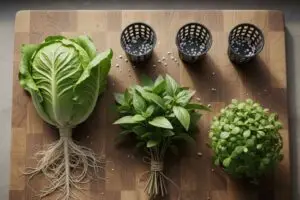
Top Beginner Crops
- Lettuce (Easiest!)
- Ready to harvest: 4-6 weeks
- According to VegBed, lettuce is one of the most popular crops for beginner hydroponic gardeners because it has short growth cycles and adapts well to indoor systems
- Try: Buttercrunch, Red Leaf, Romaine
- Herbs
- Basil: According to VegBed, basil is hardy, compact, doesn’t require high light, and is always in high demand for culinary use, making it an easy choice for beginners
- Mint: Grows like crazy (almost too fast!)
- Parsley: Reliable and productive
- Cilantro: Quick growing
- Microgreens
- Ready to eat: 7-14 days
- Super nutritious
- Easy and fast
- Try: Sunflower, pea shoots, radish
Crops to Avoid as a Beginner
According to Square Mile Farms, tall plants like tomatoes can be difficult in DWC systems because roots are not well anchored, and you’ll need proper support.
Save these for later:
- Tomatoes (need more space and support)
- Peppers (need more light)
- Root vegetables like carrots (need special systems)
Pest Control: Managing Aphids Indoors Without Chemicals
Good news! Growing indoors means fewer pests than outdoor gardens. But sometimes bugs still show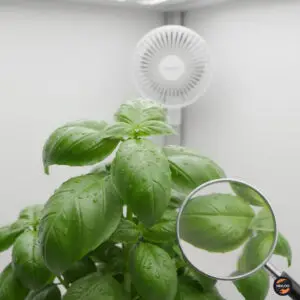 up.
up.
Common Indoor Pests
- Aphids: Tiny green or white bugs on leaves
- Fungus gnats: Small flies around wet areas
- Spider mites: Tiny dots that leave webbing
How to Control Pests Without Chemicals
Prevention (Best Strategy):
- Keep your growing area clean
- Don’t overwater or leave standing water
- Provide good air circulation with a small fan
- Inspect plants regularly
If pests appear:
For aphids:
- Spray plants with plain water to knock them off
- Use a cotton swab dipped in rubbing alcohol to remove them
- Spray with diluted dish soap solution (1 teaspoon soap per quart of water)
For fungus gnats:
- Let growing medium dry slightly between waterings
- Cover water surface with a layer of sand
- Use yellow sticky traps
For spider mites:
- Increase humidity around plants
- Spray with water daily
- Neem oil spray (organic option)
Pro tip: Keeping plants healthy is the best pest prevention. Healthy plants with proper light, nutrients, and pH resist pests naturally.
Automation: Using Smart Plugs for Light Cycles
You don’t need to remember to turn lights on and off every day, let technology help!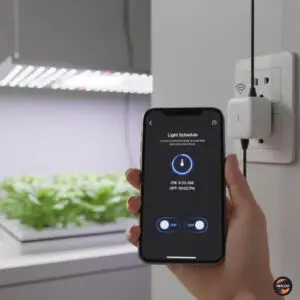
Why Automate Your Lights?
- Plants need consistent light schedules
- You might forget or be away from home
- Consistent timing = better growth
Simple Automation Setup
What you need:
- A basic outlet timer (costs $8-15 at hardware stores)
- OR a smart plug that connects to your phone ($15-25)
How to set it up:
- Plug the timer into your wall outlet
- Plug your grow light into the timer
- Set the timer for your desired schedule
Recommended light schedule:
- Lettuce and herbs: 14-16 hours on, 8-10 hours off
- Seedlings: 12-14 hours on, 10-12 hours off
Smart plug benefits:
- Control from your phone
- Monitor energy usage
- Adjust schedule remotely
- Get notifications if power goes out
Popular brands: TP-Link Kasa, Wemo, Amazon Smart Plug
Pro tip: According to the Home Depot guide, you can use smartphone technology through apps on your phone to control hydroponic systems.
Harvesting: The “Cut and Come Again” Method
This is the most exciting part eating what you’ve grown! The “Cut and Come Again” method lets you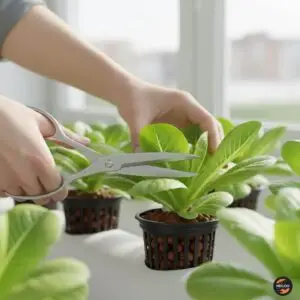 harvest multiple times from the same plant.
How It Works
Instead of pulling the whole plant out, you cut only the outer leaves and let the center keep growing. The plant produces new leaves, and you can harvest again in 1-2 weeks.
Step-by-Step Harvesting
For Lettuce:
- Wait until leaves are at least 3-4 inches long (usually 3-4 weeks after planting)
- Use clean scissors or a sharp knife
- Cut outer leaves about 1 inch above the base
- Leave the center (growing point) intact
- Harvest every 5-7 days for continuous production
According to Rise Gardens, for continuous production, harvest mature outer leaves while leaving smaller inner leaves to keep growing, enabling harvests every 3-5 days for weeks.
For Herbs:
- Wait until plant is at least 6 inches tall
- Cut stems just above a leaf node (where leaves attach)
- Never remove more than 1/3 of the plant at once
- Plant will branch out and grow bushier
According to VegBed, regular harvesting of basil encourages bushier growth, which leads to higher yields over time.
For Microgreens:
- Harvest when first true leaves appear (7-14 days)
- Cut just above the growing medium
- Rinse and eat immediately
- Start a new batch for continuous supply
Storage Tips
- Rinse harvested greens in cool water
- Pat dry gently
- Store in the refrigerator in a container with a damp paper towel
- Eat within 3-5 days for best flavor and nutrition
Getting Started: Your First Setup
Now that you understand all the pieces, here’s a simple plan to start your first hydroponic garden:
Beginner Shopping List (Budget: $80-150)
Essential items:
- 5-gallon bucket with lid ($5)
- Net pot (2-3 inch) ($3)
- Air pump with air stone ($12-15)
- Clay pebbles or grow rocks ($10)
- LED grow light (small) ($30-60)
- Hydroponic nutrients ($15-20)
- pH test kit ($15)
- Timer or smart plug ($10-20)
- Seeds ($3-5)
Where to buy:
- Hardware stores: buckets, timers
- Pet stores: air pumps
- Garden centers or Amazon: everything else
- Local hydroponic stores: Expert advice included!
Week-by-Week Timeline
Week 1: Set up system, start seeds in cubes Week 2: Monitor seedlings, adjust lights Week 3: Transplant to main system Week 4-5: Watch plants grow, check pH and nutrients weekly Week 6: Start harvesting lettuce!
Maintenance Routine
Daily (2 minutes):
- Check that lights turned on
- Look at plants for problems
Every 2-3 days (5 minutes):
- Check water level
- Test and adjust pH
- Add water if needed
Weekly (10 minutes):
- Test nutrient strength (EC meter optional but helpful)
- Check roots for brown or slimy spots
- Clean any algae from bucket
Every 2 weeks (20 minutes):
- Change nutrient solution completely
- Rinse system
- Add fresh nutrients
According to Oklahoma State University, it is advisable to replace the nutrient solution completely every two weeks to prevent sodium buildup and maintain proper nutrient ratios.
Troubleshooting Common Problems
Yellow leaves:
- Usually means nitrogen deficiency
- Add more nutrients or use fresh solution
Brown leaf tips:
- Could be nutrient burn (too strong)
- Dilute nutrient solution
Slow growth:
- Check light distance (may be too far)
- Check pH (probably too high or low)
- Check water temperature (should be 65-75°F)
Slimy roots:
- Water is too warm or needs more oxygen
- Add more air bubbles
- Change water more frequently
Wilting plants:
- Check if roots are touching water
- Make sure air pump is working
- Check for root rot
Final Tips for Success
- Start small: One or two plants in your first system
- Keep notes: Write down what works and what doesn’t
- Be patient: Your first harvest teaches you more than any guide
- Join communities: Online forums and local groups offer support
- Have fun: Growing your own food is rewarding!
According to Fork Farms, with time and practice, many people can become skilled hydroponic gardeners, and while there’s a learning curve, getting started is easy with the right resources and support.
Remember, even experienced growers started as beginners. Every mistake is a learning opportunity. Within 6 weeks, you’ll be eating fresh, homegrown salads and saving money at the grocery store!
Additional Resources
- University of Minnesota Extension – Small-Scale Hydroponics Guide
- com – pH and nutrient guides
- YouTube channels: Search “beginner hydroponics DWC” for visual guides
- r/Hydroponics on Reddit – Active community of helpful growers
Ready to start? Grab that bucket, order your supplies, and begin your indoor growing adventure today!
Note: All information in this guide is based on current research from university extensions, established hydroponic companies, and experienced growers as of 2024-2025. Growing conditions may vary based on your specific location and environment.
Watch How to Grow Food in a Closet Video